Saturday, 27 June 2015

install and configure tacacs/freeradius in centos


1) Get the TAC rpm on google based your linux architecture and install
[root@www ~]#rpm -ivh tac_plus-4.0.4.26-1.el6.nux.x86_64.rpm
warning: tac_plus-4.0.4.26-1.el6.nux.x86_64.rpm: Header V4 RSA/SHA1 Signature, k                                                            ey ID 85c6cd8a: NOKEY
Preparing...                ########################################### [100%]
        package tac_plus-4.0.4.26-1.el6.nux.x86_64 is already installed


2) Edit config file

[root@www ~]# vi /etc/tac_plus.conf
key = "MYKEY"
accounting file = /var/log/tac.acct
# authentication users not appearing elsewhere via
# the file /etc/passwd
#default authentication = file /etc/passwd

acl = default   {
                #permit = 192\.168\.0\.
                permit = 10\.255\.160\.7     <<<<< this is the IP I was to allow
}

# Example of host-specific configuration:
host = 10.255.160.7 {
        prompt = "Enter your Unix username and password, Username: "
        # Enable password for the router, generate a new one with tac_pwd
        enable = des xb5MO66xiT93Q  <<<< des + password generated with tac_pwd
}

# Group that is allowed to do most configuration on all interfaces etc.
group = sysadmin {
        # group members who don't have their own login password will be
        # looked up in /etc/passwd:
        #login = file /etc/passwd
        # or authenticated via PAM:
        login = PAM
        acl = default

        # Needed for the router to make commands available to user (subject
        # to authorization if so configured on the router
        service = exec {
                priv-lvl = 15
        }
        cmd = enable {
                permit .*
        }
        cmd = show {
                permit .*
        }
        cmd = exit {
                permit .*
        }
        cmd = configure {
                permit .*
        }
        cmd = interface {
                permit FastEthernet.*
                permit GigabitEthernet.*
        }
        cmd =  switchport  {
                permit "access vlan.*"
                permit "trunk encapsulation.*"
                permit "mode.*"
                permit "trunk allowed vlan.*"
        }
        cmd = description {
                permit .*
        }

        cmd = no {
                permit shutdown
        }

}

user = joe {
        login = cleartext MYpassword  <<<< to put pwd in cleartext in config use "cleartext"
        #member = sysadmin
        member = admin
}

user = testuser {
        default service = permit
        login = PAM
        member = admin
}

user = fred {
        login = PAM
        member = sysadmin
}

# User account configured for use with "rancid"
user = rancid {
        # Generate a new password with tac_pwd
        #login = des LXUxLCkFhGpwA

        service = exec {
                priv-lvl = 15
        }

        cmd = show { permit .* }
        cmd = exit { permit .* }
        cmd = dir { permit .* }
        cmd = write { permit term }
}

# Global enable level 15 password, generate a new one with tac_pwd
user = $enab15$ {
        login = des xb5MO66xiT93Q
}

#user = DEFAULT {
#       login = PAM
#member = default
#}

***** AX config ( A10 load balancer  config)
authorization commands 15 method tacplus
authentication type tacplus local
authentication console type tacplus local
authentication login privilege-mode
accounting exec start-stop tacplus
accounting commands 15 stop-only tacplus
tacacs-server host 10.255.161.55 secret secret-encrypted CtFNhJOqYs08EIy41dsA5zwQjLjV2wDnPBCMuNXbAOc8EIy41dsA5zwQjLjV2wDn port 49 timeout 12


[root@www ~]# ssh joe@10.255.160.7
Password:
Last login: Sun Jun 21 03:11:07 2015 from 10.255.161.55

ACOS System is ready now.

[type ? for help]

AX02#
******************************** FREERADIUS *****************************
[root@www ~]# ls freeradius-*
freeradius-2.1.12-6.el6.x86_64.rpm
freeradius-mysql-2.1.12-6.el6.x86_64.rpm
freeradius-utils-2.1.12-6.el6.x86_64.rpm
[root@www ~]#

[root@www ~]# rpm -ivh freeradius-*
Preparing...                ########################################### [100%]
   1:freeradius             ########################################### [ 33%]
   2:freeradius-mysql       ########################################### [ 67%]
   3:freeradius-utils       ########################################### [100%]

[root@www ~]# service radiusd restart
Stopping radiusd:                                          [  OK  ]
Starting radiusd:                                          [  OK  ]

3) check whether ports are listening/open
[root@www ~]# netstat -nulp | grep radiu
udp        0      0 0.0.0.0:44946               0.0.0.0:*                               19995/radiusd
udp        0      0 0.0.0.0:1812                0.0.0.0:*                               19995/radiusd
udp        0      0 0.0.0.0:1813                0.0.0.0:*                               19995/radiusd
udp        0      0 0.0.0.0:1814                0.0.0.0:*                               19995/radiusd
udp        0      0 127.0.0.1:18120             0.0.0.0:*                               19995/radiusd

**** Adding user
[root@www ~]# vi /etc/raddb/users
#"John Doe"     Cleartext-Password := "hello"
siaka Cleartext-Password := "password"

**** testing server connectivity
[root@www ~]# radtest siaka password localhost 1812 testing123
Sending Access-Request of id 4 to 127.0.0.1 port 1812
        User-Name = "siaka"
        User-Password = "password"
        NAS-IP-Address = 127.0.0.1
        NAS-Port = 1812
        Message-Authenticator = 0x00000000000000000000000000000000
rad_recv: Access-Reject packet from host 127.0.0.1 port 1812, id=4, length=20 ( this is good sign)

**** adding client
[root@www ~]# vi /etc/raddb/clients.conf
client 10.255.160.7 {
        secret          = testing123
}

[root@www ~]# service radiusd restart
Stopping radiusd:                                          [  OK  ]
Starting radiusd:                                          [  OK  ]
[root@www ~]#


******* A10 box config
AX02(config)#radius-server host 10.255.161.55 secret testing123
AX02(config)#authentication type radius local
AX02(config)#accounting exec start-stop radius

******* test time
Last login: Sun Jun 21 20:50:23 2015 from 10.200.2.150

ACOS System is ready now.

[type ? for help]

AX02#


******* on A10 box
AX02#sh radius-server
Radius server              : 10.255.161.55
contact start              : 2
contact failed             : 0
authentication success     : 1
authentication failed      : 0
authorization success      : 1


****************************** other resources
https://networklessons.com/linux/how-to-install-tacacs-on-linux-centos/

Thursday, 25 June 2015

Socket Programming (python)


******** client.py
#!/usr/bin/python

#importing socket module for socket creation and sys for user input/output
import socket
import sys


## to accept user input of hostname and port
(host,port)=(sys.argv[1],int(sys.argv[2]))
print "host is",host
print "port is",port

#creating and a socket and connecting to host via port
socket=socket.socket()
socket.connect((host, port))

#prompting user for input 
input=raw_input("user>")
while input != "bye":
  socket.send(input)
  data=str(socket.recv(65535))
  print data 
  input=raw_input("user>")


socket.close()


******** server.py
#!/usr/bin/python

import socket
import sys
#import subprocess
import commands

socket=socket.socket(socket.AF_INET,socket.SOCK_STREAM)
#socket.setsockopt(socket.SOL_SOCKET, socket.SO_REUSEADDR, 1)
server=("localhost",12000)
socket.bind(server)
socket.listen(5)
conn,clientip=socket.accept()

var=1

while var==1:
 print "conn accepted"
 data=str(conn.recv(65635))
 print "data received"

 if data != "" and data != "bye":
#   p = subprocess.Popen(['ls'],stdout=subprocess.PIPE)
   result=commands.getoutput(data)
   print "printing result:" ,result
   print "sending result"

 if result =="":
   result = " "

 conn.send(result)
 print "result sent"

 if data == "bye":
   conn.close

   socket.close

******** result
siakas-MacBook-Pro:PYTHON siaka$ ./client.py localhost 12000
host is localhost
port is 12000
user>ls -lh
total 56
-rwxr-xr-x  1 siaka  staff   534B Jun 14 05:54 client.py
-rwxr-xr-x  1 siaka  staff   1.2K Jun 14 03:46 client2.py
-rwxr-xr-x  1 siaka  staff    86B Jun 14 04:01 cmd.py
-rwxr-xr-x  1 siaka  staff   154B Jun 14 03:39 getargs.py
-rwxr-xr-x  1 siaka  staff   594B Jun 13 20:47 python.py
-rwxr-xr-x  1 siaka  staff   1.5K Jun 14 03:45 serv1.py
-rwxr-xr-x  1 siaka  staff   703B Jun 14 05:56 server.py
user>touch file{1..10}

user>ls -lh
total 56
-rwxr-xr-x  1 siaka  staff   534B Jun 14 05:54 client.py
-rwxr-xr-x  1 siaka  staff   1.2K Jun 14 03:46 client2.py
-rwxr-xr-x  1 siaka  staff    86B Jun 14 04:01 cmd.py
-rw-r--r--  1 siaka  staff     0B Jun 14 18:29 file1
-rw-r--r--  1 siaka  staff     0B Jun 14 18:29 file10
-rw-r--r--  1 siaka  staff     0B Jun 14 18:29 file2
-rw-r--r--  1 siaka  staff     0B Jun 14 18:29 file3
-rw-r--r--  1 siaka  staff     0B Jun 14 18:29 file4
-rw-r--r--  1 siaka  staff     0B Jun 14 18:29 file5
-rw-r--r--  1 siaka  staff     0B Jun 14 18:29 file6
-rw-r--r--  1 siaka  staff     0B Jun 14 18:29 file7
-rw-r--r--  1 siaka  staff     0B Jun 14 18:29 file8
-rw-r--r--  1 siaka  staff     0B Jun 14 18:29 file9
-rwxr-xr-x  1 siaka  staff   154B Jun 14 03:39 getargs.py
-rwxr-xr-x  1 siaka  staff   594B Jun 13 20:47 python.py
-rwxr-xr-x  1 siaka  staff   1.5K Jun 14 03:45 serv1.py
-rwxr-xr-x  1 siaka  staff   703B Jun 14 05:56 server.py
user>bye

siakas-MacBook-Pro:PYTHON siaka$ 


Monday, 15 June 2015

wireshark filters

You can find all filters keyword by expanding the element in the packet detail pane , clicking on the element and looking at the word in parenthesis at the  bottom of the capture file.


**** Layer 1
frame.encap_type == 1   # frame encapsulation type
frame.number == 35    # frame number
frame.len == 1058     # frame length


**** Layer 2
eth.dst == 00:1f:a0:02:66:29   
eth.addr == 00:1f:a0:02:66:29  # ethernet address ( same as above)
eth.type == 0x0800    #  ethernet type

*** Layer 3
ip.version == 4 # ip version 4 or 6
ip.hdr_len == 20 # ip header length
ip.dsfield == 0
ip.dsfield.dscp == 0x00
ip.dsfield.ecn == 0x00
ip.len == 1044
ip.id == 0x123   # ip identification
ip.flags == 0x00   # ip flags
ip.flags.rb == 0   # reserve bit
ip.flags.df == 0   # don't fragment bit
ip.flags.mf == 0  # more fragment bit
ip.frag_offset == 0
ip.ttl == 64
ip.proto == 6
ip.checksum == 0xaaa1
ip.src == 10.10.10.10
ip.dst == 10.10.10.10


*** Layer 4
tcp.flags.ack == 1  # tcp ack flag set to 1
tcp.hdr_len == 20   # tcp header length of 20bytes
tcp.ack == 1        # ack sequence of 1
tcp.len == 1004     # tcp segment length
tcp.dstport == 22616
tcp.srcport == 10000 

*** Layer 7
* payload 
data.data == XXXX 
* payload length
data.len == 1004

Tuesday, 17 March 2015

Fix the "Error: Cannot retrieve repository metadata (repomd.xml) for repository:"

To fix this the path of your baseurl in the yum repository config file should have the repodata/ directory under it.

[epel-repo]
name=EPEL REPOSITORY
baseurl=http://ftp.riken.jp/Linux/centos/6.6/os/x86_64/
enabled=1
gpgcheck=0


Sunday, 7 December 2014

SELINUX RHEL6 rhce/rchsa notes

What is it?
Add another layer of security to applications,files,processes and so on by denying or allowing access to those.
   
3 Modes

  • disabled: turned off
  • permissive: turned on but only logs selinux warnings without blocking action
  • enforcing : turned on and blocking selinux security violaitions
SELinux Context
Each files,directory and services have 3 contexts (labels) which are used in combination with booleans to permit action or service to run.
  • user:
    • unconfined_u : unprotected user
    • system_u : system user
    • normal_u : normal user
  • role :
    • object_r : file
    • system_r : users and processes
  • type(also called domain):
    • unconfined_r  : unprotected file or processes
  • multi-level (used in RHEL6 represents sensitivity level of an object:file/directory)
Changing file SeLinux Context
chcon -u <user context> <filename>
chcon -r <role context> <filename>
chcon -t <type context> <filename>

To keep the changes permanent even if the file system is relabeled.
#semanage fcontext -a -u <user context> -r <role context> -t <type context> <file>
#restorecon -R -v <file>|<directory>

Resetting file SeLinux Context
restorecon -F <filename>

View files/directories SeLinux context
  • ls -Z / ps -Z
Query SeLinux Boolean for a process
getsebool -a | grep <process>

Get a boolean description
semanage boolean -l | grep <process>

Getting and Setting Boolean status
getsebool <boolean name>
setsebool [-P(to set permanent)] <boolean name>

SELinux Troubleshooting
packages to install for troubleshooting
  # yum -y install policycoreutils* selinux-policy setroubleshoot-server

commands to look for errors
 # grep "is preventing" /var/log/messages
 # grep "denied" /var/log/audit/audit.log 
 # sealeart -a /var/log/audit/audit.log
get more details on errors by using the ID attached to them
 # sealert -l <ID in /var/log>
when a denial occurs on the system , you see an ID associated to service happens 

Other Commands
# sestatus 
SELinux status:                 enabled
SELinuxfs mount:                /selinux
Current mode:                   enforcing
Mode from config file:          enforcing
Policy version:                 24
Policy from config file:        targeted

matchpathcon (tells you what the label of the file should be based on directory path label)
matchpathcon -V /etc/init.d/my-httpd 
/etc/init.d/my-httpd has context unconfined_u:object_r:initrc_exec_t:s0, should be system_u:object_r:httpd_initrc_exec_t:s0

$ restorecon -v -F /etc/init.d/my-httpd 
restorecon reset /etc/rc.d/init.d/my-httpd context unconfined_u:object_r:initrc_exec_t:s0->system_u:object_r:initrc_exec_t:s0

$ matchpathcon -V /etc/init.d/my-httpd 
/etc/init.d/my-httpd has context system_u:object_r:initrc_exec_t:s0, should be system_u:object_r:httpd_initrc_exec_t:s0
To get more commands about SELinux
apropos selinux


Thursday, 6 November 2014

disable PXE boot on vSphere client's VM ( PXE ブートを無効にする方法 Vsphereクライアントで)

When You import your ISO file on the vSphere client and start booting the VM you see a PXE boot that fails and displays "system not found" . Here is a way to solve the issue.
vSphereでCDにISOをいれたらPXEブートで開始し、インストールが失敗します。それを解決する方法を紹介します。


Right Click on VM -> Edit Settings -> Hardware -> Click on CD/DVD -> power on startup
VMに右クリックし --> 設定の編集 --> ハードウエア --> CD/DVDドライブ1を選択 --> パワーオン時に接続

Saturday, 13 July 2013

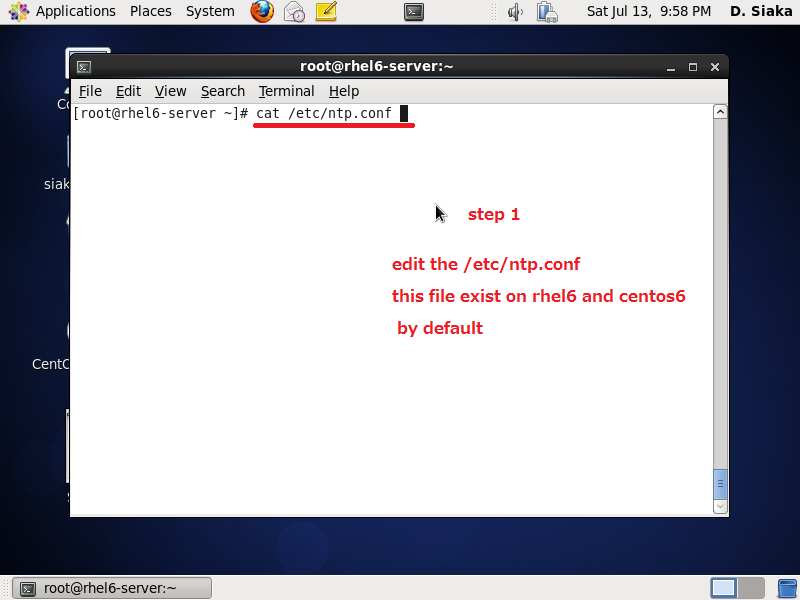
LINUX - Install NTP server on CentOS6

PURPOSE
Install an NTP server on CentOS 6.

STEPS

1. Configure /etc/ntp.conf
2. Start ntp service
3. Enable ntp during startup
4. Open ntp service port with iptables
5. Check synchronization

SCREENSHOTS


dont forget to enable ntp at boot time with "chkconfig ntp on"


Simple way of transfering files from Virtualbox to Host and Vice Versa

PURPOSE
Simple way of transfering files from Virtualbox to Host and Vice Versa using tera term.

STEPS
1. Set port forwarding from your host to your virtualbox VM as below


2. SSH to your VM with teraterm


3. To send files from your host to your VM or vice versa proceed select File Menu -> SSH SCP


DONE

Sunday, 16 June 2013

Login Form with JAVA JSP and twitter bootstrap CSS with netbeans IDE 7

PURPOSE
Create a login form with java jsp using bean and twitter bootstrap css in netbeans

ENVIRONMENT

OS:Windows 7
Web server : Apache Tomcat 7.0.34
Netbeans:version 7.3.1
Bootstrap: version 2.3.2
STEPS

1. create a project called JspAndMySql in netbeans.Automatically the index.jsp gets created it
   a. make sure your tomcat or glassfish is up and the ports they used are not in use
   b. click on run to see whether you see the index.jsp displayed

2. use the login template on twitter bootstrap website found here
  a.write clicking on the page and display source code
  b.copy and paste it from the <!DOCTYPE> part in index.jsp(netbeans)
  c.get rid of the javascript part in the lower part of the html
  d.find and replace all(CTRL-H) the "../assets/css" by "" . we will create the css in the same directory
  e. add an action,a method and a name property to the elements in the html form
  ※ if you do it like i told you,your file should like this:

------------------------------------ index.jsp ----------------------------------
<%--
    Document   : index
    Created on : 2013/06/16, 7:54:48
    Author     : doumbiaz
--%>

<%@page contentType="text/html" pageEncoding="UTF-8"%>
<!DOCTYPE html>
<html lang="en">
  <head>
    <meta charset="utf-8">
    <title>Sign in &middot; Twitter Bootstrap</title>
    <meta name="viewport" content="width=device-width, initial-scale=1.0">
    <meta name="description" content="">
    <meta name="author" content="">

    <!-- Le styles -->
    <link href="bootstrap.css" rel="stylesheet">
    <style type="text/css">
      body {
        padding-top: 40px;
        padding-bottom: 40px;
        background-color: #f5f5f5;
      }

      .form-signin {
        max-width: 300px;
        padding: 19px 29px 29px;
        margin: 0 auto 20px;
        background-color: #fff;
        border: 1px solid #e5e5e5;
        -webkit-border-radius: 5px;
           -moz-border-radius: 5px;
                border-radius: 5px;
        -webkit-box-shadow: 0 1px 2px rgba(0,0,0,.05);
           -moz-box-shadow: 0 1px 2px rgba(0,0,0,.05);
                box-shadow: 0 1px 2px rgba(0,0,0,.05);
      }
      .form-signin .form-signin-heading,
      .form-signin .checkbox {
        margin-bottom: 10px;
      }
      .form-signin input[type="text"],
      .form-signin input[type="password"] {
        font-size: 16px;
        height: auto;
        margin-bottom: 15px;
        padding: 7px 9px;
      }

    </style>
    <link href="bootstrap-responsive.css" rel="stylesheet">

    <!-- HTML5 shim, for IE6-8 support of HTML5 elements -->
    <!--[if lt IE 9]>
      <script src="../assets/js/html5shiv.js"></script>
    <![endif]-->

    <!-- Fav and touch icons -->
    <link rel="apple-touch-icon-precomposed" sizes="144x144" href="../assets/ico/apple-touch-icon-144-precomposed.png">
    <link rel="apple-touch-icon-precomposed" sizes="114x114" href="../assets/ico/apple-touch-icon-114-precomposed.png">
      <link rel="apple-touch-icon-precomposed" sizes="72x72" href="../assets/ico/apple-touch-icon-72-precomposed.png">
                    <link rel="apple-touch-icon-precomposed" href="../assets/ico/apple-touch-icon-57-precomposed.png">
                                   <link rel="shortcut icon" href="../assets/ico/favicon.png">
  </head>

  <body>

    <div class="container">

      <form class="form-signin" action="login.jsp" method="POST">
        <h2 class="form-signin-heading">Please sign in</h2>
        <input type="text" class="input-block-level" name="email" placeholder="Email address">
        <input type="password" class="input-block-level" name="password" placeholder="Password">
        <label class="checkbox">
          <input type="checkbox" value="remember-me"> Remember me
        </label>
        <button class="btn btn-large btn-primary" type="submit">Sign in</button>
      </form>

    </div> <!-- /container -->
  </body>
</html>


  f.create the entities in beans by write clicking on Source Package->New->Java package and call the package beans
  g.write click on "beans" package,create a java class called "session.java"

-------------------------- session.java ----------------------------------
/*
 * To change this template, choose Tools | Templates
 * and open the template in the editor.
 */
package beans;

/**
 *
 * @author doumbiaz
 */
public class session {
    String email;
    String password;
 
    public String getEmail() {
        return email;
    }

    public void setEmail(String email) {
        this.email = email;
    }

    public String getPassword() {
        return password;
    }

    public void setPassword(String password) {
        this.password = password;
    }
 
}


3.create two css files in netbeans under webpage called bootstrap.css and bootstrap-responsive.css
  a.copy and paste in each files the css of bootstrap.css and bootstrap-responsive.css from the bootstrap download package in their corresponding filename

4. create a database test with a table users having the following columns:
    id (incremental,primary),email (varchar with 255 length),password(varchar with 255 length)
  a. creating a user in your database with an email and password for test purpose

5. write the code for action page : login.jsp by first write clicking on libraries in netbeans and add mysql jdbc driver(we are going to connect to mysql)

-----------------------------  login.jsp ------------------------------

<%--
    Document   : login
    Created on : 2013/06/16, 8:04:40
    Author     : doumbiaz
--%>

<%@page contentType="text/html" pageEncoding="UTF-8"
import="java.sql.*"
%>

<%
String email="",password="";
if(request.getParameter("email")!=null){
    email=request.getParameter("email");
}
if(request.getParameter("password")!=null){
    password=request.getParameter("password");
}
%>

<%
Connection con=null;
PreparedStatement pst=null;
ResultSet re=null;
String url="jdbc:mysql://localhost:3306/test";
String Driver="com.mysql.jdbc.Driver";
String user="root";
String pass="";

Class.forName(Driver);
con=DriverManager.getConnection(url,user,pass);
String sql="select * from users where email = ? and password = ?";
try{
pst=con.prepareStatement(sql);
pst.setString(1,email);
pst.setString(2,password);
re=pst.executeQuery();
if(re.next()){
    out.println("CONNECTED!!!");
}else{
    out.println("LOGIN FAILED!!!");
}
} catch(Exception e){
 
    out.println("ERROR CONNECTING");
}
%>


<!DOCTYPE html>
<html>
    <head>
        <meta http-equiv="Content-Type" content="text/html; charset=UTF-8">
        <title>JSP Page</title>
    </head>
    <body>
        <h1>Hello World!</h1>
        <jsp:useBean id="actualsession" class="beans.session" scope="session"/>
        <jsp:setProperty name="actualsession" property="email" value="<%=email%>"/>
        <jsp:setProperty name="actualsession" property="password" value="<%=password%>"/>
 
  <%--  
        <jsp:getProperty name="actualsession" property="email"/><br/>
        <jsp:getProperty name="actualsession" property="password"/><br/>
  --%>  
     
     
    </body>

</html>

----------------------------------------------------------------
4. click on run to see whether you get the same layout as a bootstrap login page
5.Test
 WHEN THE CREDENTIALS ARE CORRECT

WHEN THE CREDENTIALS ARE NOT CORRECT

Tuesday, 28 May 2013

Twitter Bootstrap tutorial 01 (twitter boostrap base template)

PURPOSE
show the code of a basic twitter bootstrap html template

WHAT YOU NEED TO KNOW

  • in the template header include bootstrap.css/bootstrap.js and jquery.js
  • you need to put the doctype at the beginning becoz twitter bootstrap uses html5
  • if you want to make it responsive meaning(flexibly changing layout according to device) you can include the bootstrap-responsive.css in the header.

CODE
<!DOCTYPE html>
<html>
  <head>
    <title>Bootstrap Template</title>
    <meta name="viewport" content="width=device-width, initial-scale=1.0">
    <link rel="stylesheet" type="text/css" href="css/bootstrap.min.css"  >
    <link rel="stylesheet" type="text/css" href="css/bootstrap-responsive.css"  >
  </head>
  <body>
    <h1>Hello, world!</h1>
    <script src="http://code.jquery.com/jquery.js"></script>
    <script src="js/bootstrap.min.js"></script>
  </body>
</html


TEST
you can test responsiveness with the next tutorial.

Twitter Bootstrap tutorial 02 (grids and layouts system)

PURPOSE
Grids are small boxes css-ed by twitter bootstrap where you can put content.
it consists of 12 columns per row and the structure to create one is :
  container-div > row-div > span-div

There are two types of grid: fixed and fluid. In the fixed grid the size of the boxes
 are based on pixels but in the fluid there are based on percentage which means
 according to your device width and height,boxes may be larger or smaller.

fixed grid


WHAT YOU NEED TO KNOW
Below is the basic format for a 12columns fully occupied,you can make small boxes of size 1 twelve times or 6 twice and so on. if you go over 12 columns,the next box shows up on the next line.

 <div class="container">
  <div class="row">
   <div class="span12">(content goes here)
   </div>
 </div>
</div>

CODE


<!DOCTYPE html>
<html>
 <head>
  <title>Scaffolding</title>
  <link type="text/css" rel="stylesheet" href="css/bootstrap.css">
  <script src="js/bootstrap.js"></script>
  <script src="js/jquery.js"></script>
  <style>
  .span1,.span2,.span3,.span4,.span5,.span6,.span7,.span8,.span9,.span10,.span11,.span12{
  background: black;
  color:white;
  text-align:center;
  margin-bottom: 5px;
  margin-top:5px;
  }

  </style>
 </head>
<body>
<div class="container">
     <div class="row">
       <div class="span1">1
       </div>
       <div class="span1">1
       </div>
       <div class="span1">1
       </div>
       <div class="span1">1
       </div>
       <div class="span1">1
       </div>
       <div class="span1">1
       </div>
       <div class="span1">1
       </div>
       <div class="span1">1
       </div>
       <div class="span1">1
       </div>
       <div class="span1">1
       </div>
       <div class="span1">1
       </div>
       <div class="span1">1
       </div>
     </div>
     <div class="row">
       <div class="span2">2
       </div>
       <div class="span2">2
       </div>
       <div class="span2">2
       </div>
       <div class="span2">2
       </div>
       <div class="span2">2
       </div>
       <div class="span2">2
       </div>
     </div>
     <div class="row">
       <div class="span3">3
       </div>
       <div class="span3">3
       </div>
       <div class="span3">3
       </div>
       <div class="span3">3
       </div>
     </div>
     <div class="row">
       <div class="span4">4
       </div>
       <div class="span4">4
       </div>
       <div class="span4">4
       </div>
     </div>
     <div class="row">
       <div class="span5">5
       </div>
       <div class="span5">5
       </div>
       <div class="span2">2
       </div>
     </div>
     <div class="row">
       <div class="span6">6
       </div>
       <div class="span6">6
       </div>
     </div>
     <div class="row">
       <div class="span7">7
       </div>
       <div class="span5">5
       </div>
     </div>
      <div class="row">
       <div class="span8">8
       </div>
       <div class="span4">4
       </div>
     </div>
     <div class="row">
       <div class="span9">9
       </div>
       <div class="span3">3
       </div>
     </div>
     <div class="row">
       <div class="span10">10
       </div>
       <div class="span2">2
       </div>
     </div>
      <div class="row">
       <div class="span11">11
       </div>
       <div class="span1">1
       </div>
     </div>
      <div class="row">
       <div class="span12">12
       </div>
     </div>
      <div class="row">
       <div class="span6 offset6">span6 with offset6
       </div>
     </div>
     <div class="row">
       <div class="span12" style="background:yellow;color:black">nested row
        <div class="row" >
           <div class="span6" >span6</div>
           <div class="span6">span6</div>
        </div>
       </div>
     </div>
    </div>


</body>
</html>
OUTPUT


fluid grid

we will use the same code above and replace "container" by "container-fluid" and "row" by "row-fluid" and also make sure that all nested rows have their columns equal to 12 if not it
 will not display as in the fixed grid. You will see that with the fluid grid , the boxes spread all
 over the screen and are responsive like the fixed grid. You can put both on the same page and see the difference.

CODE
<div class="container-fluid">
     <div class="row-fluid">
       <div class="span1">1
       </div>
       <div class="span1">1
       </div>
       <div class="span1">1
       </div>
       <div class="span1">1
       </div>
       <div class="span1">1
       </div>
       <div class="span1">1
       </div>
       <div class="span1">1
       </div>
       <div class="span1">1
       </div>
       <div class="span1">1
       </div>
       <div class="span1">1
       </div>
       <div class="span1">1
       </div>
       <div class="span1">1
       </div>
     </div>
     <div class="row-fluid">
       <div class="span2">2
       </div>
       <div class="span2">2
       </div>
       <div class="span2">2
       </div>
       <div class="span2">2
       </div>
       <div class="span2">2
       </div>
       <div class="span2">2
       </div>
     </div>
     <div class="row-fluid">
       <div class="span3">3
       </div>
       <div class="span3">3
       </div>
       <div class="span3">3
       </div>
       <div class="span3">3
       </div>
     </div>
     <div class="row-fluid">
       <div class="span4">4
       </div>
       <div class="span4">4
       </div>
       <div class="span4">4
       </div>
     </div>
     <div class="row-fluid">
       <div class="span5">5
       </div>
       <div class="span5">5
       </div>
       <div class="span2">2
       </div>
     </div>
     <div class="row-fluid">
       <div class="span6">6
       </div>
       <div class="span6">6
       </div>
     </div>
     <div class="row-fluid">
       <div class="span7">7
       </div>
       <div class="span5">5
       </div>
     </div>
      <div class="row-fluid">
       <div class="span8">8
       </div>
       <div class="span4">4
       </div>
     </div>
     <div class="row-fluid">
       <div class="span9">9
       </div>
       <div class="span3">3
       </div>
     </div>
     <div class="row-fluid">
       <div class="span10">10
       </div>
       <div class="span2">2
       </div>
     </div>
      <div class="row-fluid">
       <div class="span11">11
       </div>
       <div class="span1">1
       </div>
     </div>
      <div class="row-fluid">
       <div class="span12">12
       </div>
     </div>
      <div class="row-fluid">
       <div class="span6 offset6">span6 with offset6
       </div>
     </div>
     <div class="row-fluid">
       <div class="span12" style="background:yellow;color:black">nested row-fluid
        <div class="row-fluid" >
           <div class="span6" >span6</div>
           <div class="span6">span6</div>
        </div>
       </div>
     </div>
    </div>

OUTPUT


Friday, 24 May 2013

Setting Up Virtual Hosts in XAMPP

PURPOSE
Setting Up Virtual Hosts in XAMPP

ENVIRONMENT

  • XAMPP 1.8.1


Steps
  1. Open  C:\windows\system32\drivers\etc\hosts with admin privilege
  2. Add "127.0.0.1      Site.com" at the end of the file and save
  3. Edit C:\xampp\apache\conf\extra\httpd-vhosts.conf and add the following
NameVirtualHost *:80
  <VirtualHost *>
    DocumentRoot "C:\xampp\htdocs"
    ServerName localhost
    ErrorLog "logs/localhost-error.log"
    CustomLog "logs/localhost-access.log" combined
  </VirtualHost>

  <VirtualHost *>
    DocumentRoot "C:\xampp\htdocs\phpacademy.com"
    ServerName phpacademy.com 
    ErrorLog "logs/phpacademy.com-error.log"
    CustomLog "logs/phpacademy.com-access.log" combined
  <Directory "C:\xampp\htdocs\phpacademy.com">
    Order allow,deny
    Allow from all
  </Directory>
</VirtualHost>


Using CodeIgniter with BootStrap

PURPOSE OF THIS TUTORIAL

Showing you how to use twitter bootstrap with codeigniter

ENVIRONMENT

  • NetBeans IDE 7.2.1 
  • xampp 1.8.1
  • JQuery 
  • Twitter BootStrap


STEPS
  • download CodeIgniter and unzip
  • download the minified and source Bootstrap and unzip 
  • download JQuery and unzip
    • if you are using xampp 
      •  move "applications","system" and "index.php" from CodeIgniter folder to c:\xampp\htdocs\<project-name>\
      • merge the "js","img","css","less" file from the the minified and source bootstrap unzipped folder and move them to c:\xampp\htdocs\<project-name>\
      • rename the JQuery javascript file in the unzipped JQuery folder to jquery.js and move it to the "js" directory under c:\xampp\htdocs\<project-name>\
  • start creating an existing project of CodeIgniter for c:\xampp\htdocs\<projectname>
  • replace the welcome_message.php of codeigniter by one of the templates in bootstrap examples  and replace all the "../assets/" by "<?php echo base_url(); ?>" but for the base_url function to work you have to add "$autoload['helper'] = array('url');" under applications/autoload.php in your codeigniter project folder
  • test 

Sunday, 27 January 2013

Install Expect in Windows with Activetcl/tk

OBJECTIVE:
This is a tutorial on how to get Expect to run on windows.
The steps are shown below. This is for those who installed a version of
 activetcl that is above 8.4.9.X.Expect might not be installed by default.If you installed activetcl version  8.4.9.16 you have expect installed by default.The download link can be found here:
http://www.activestate.com/activetcl/downloads


STEPS
1. Download ActiveTcl here http://www.activestate.com/activetcl/downloads

2. After installing which is pretty straight forward,configure your environmental variable path to point to :C:\Tcl\bin(or your install directory/bin)

3. Expect might not be installed by default so in the command line run :
     > teacup install Expect

4. if you want to see other commands related to teacup use the "teacup help"

   C:\temp>teacup help

    teacup.exe
    is a tool to access package repositories

        teacup.exe help cmds-by-group   Grouped list of commands provided by tea
cup
        teacup.exe help commands        Alphabetical list of commands provided b
y teacup
        teacup.exe help help            How to use help
        teacup.exe help options         Describes the standard options
        teacup.exe help queries         Describe the syntax of complex queries

C:\temp>teacup help commands

    commands -- Alphabetical list of commands provided by teacup

    Use 'help <commandname>' to get detailed help for a command.

    teacup.exe archive     Manage archives
    teacup.exe cache       Manage cache settings
    teacup.exe create      Create installation repository
    teacup.exe default     Manage installation repository
    teacup.exe delete      Delete installation repository
    teacup.exe describe    Describe package found in an archive
    teacup.exe get         Get archive file of package found in an archive
    teacup.exe install     Get and install a package found in an archive or file

    teacup.exe keys        List meta data keys found in the archives
    teacup.exe link        Manage links between installation repositories and tc
l shells
    teacup.exe list        List packages found in the archives
    teacup.exe log         Manage the log of installed/removed packages
    teacup.exe profiles    Find and list profile packages found in the archives
    teacup.exe proxy       Manage proxying
    teacup.exe regenerate  Recreate broken toplevel pkgIndex.tcl files
    teacup.exe remove      Remove installed packages
    teacup.exe search      Search and list packages using complex queries
    teacup.exe setup       Enable tcl shells to handle installation repositories

    teacup.exe timeout     Manage timeout
    teacup.exe update      Update local repository from the archives.
    teacup.exe update-self Get newest revision of teacup.exe for the platform
    teacup.exe version     Print version of teacup.exe
    teacup.exe verify      Check a repository for problems.
    teacup.exe who         Print description of teacup.exe

C:\temp>

OTHERS
you can learn a lot also by looking at the demo application of tcl/tk and the source code related to it. Here is some screenshot about how you can access the demos directory and see demos source codes.


Expect script example

We will use an expect script to telnet to a router in GNS3 but you can do it with a real router if you want.You just need to turn on a router and check its console port number and telnet to it using "telnet 127.0.0.1 <console number>" to get access to the GNS3 router .

The script we will use to access the router and check its loopback config.

------ test.tcl 
  package require Expect
  spawn telnet 127.0.0.1 2001
    expect "#" { exp_send "\r"}
  expect "#" { exp_send "sh run int lo0\r"}
  expect "#" { exp_send "\r" }
  exit

-------


This represents the router config of loopback 0
from putty

                           Now lets run the expect script to check it

done